Saturday, December 13, 2008

Why I hate MacBook ..


Where to put my plug in ?

Friday, December 5, 2008

Solution to Thinkpad X200 Random Freezing Problem


Around one month ago, I got my new Thinkpad X200 and I was very happy. I plugged it to AC power and enjoy installing new programs on new Windows Vista. Until I found out later that my new Thinkpad randomly freezes when running on battery. The cursor turns into an Vista's wait cursor, and I cannot do anything with the system. Even Ctrl + Alt + Del gave me no response.

The freezing becomes really annoying when I have to do a presentation to professors at my university. X200 freezed, locked up, and I can only hold power button to do a hard-shutdown!

I begin to dig deep into this problem. The first clue was ThinkVantage Access Connections, my X200 often freezes when I mess with wireless connectivity too much. So I uninstalled it but the freezing problem still persists.

The next clue was Intel Turbo Memory (ITM) and ThinkVantage Active Protection System (APS.) I found this from "Random Lockups when on battery" thread of tabletpcreview.com.

From my understandings, The ITM is a fast memory which provides fast access to some hard disk/virtual memory contents. And APS provides shock protection to hard disk and is one of the best Thinkpad's features. The problem happens when Windows Vista push Turbo Memory into power-saving mode and then APS trying to access Turbo Memory content. The freezing is then happened. Please correct me on this if I am wrong.

The fix was easy. You just need to go to Vista's Control Panel -> Power Options -> Change Plan Settings ->Change Advanced Power Settings ->Hard disk ->And then disable "Windows Hybrid Hard Disk Power Savings Mode"

After I changed my settings for default plan, no single freezing occurs when on battery! I am now so happy with my new Thinkpad X200 :) I think I can blame no one but Lenovo for this problem. They should do some more deep QA on their Thinkpads before start shipping. I think this problem is very serious and it affects Thinkpad's brand IMHO.

Sunday, November 30, 2008

LINQ with MySQL

LINQ to SQL from Microsoft supports only their SQL Server. How about other popular DBMS such as MySQL ?

I investigate the first result returned from Google using "LINQ with MySQL" query: DbLinq. It's an opensource project which provides "LINQ to SQL" for other databases include MySQL, PostgreSQL, Oracle and SQLite.

However, the project is still at its very beginning stage and I think it will take some time before we can use it in production environment, IMHO.

Here is my setup of DbLinq with MySQL

  • Visual Studio 2008 Professional
  • MySQL 5
  • DbLinq 0.18
  • Windows Vista
1. I first have my database prepared, its name is "Items".

2. Run DbMetal which is a tool comes with DbLinq in "build" folder. I use the following command for my MySQL server. I have user root with no password.

C:\Downloads\DbLinq-0.18\DbLinq-0.18\build>DbMetal /server:127.0.0.1 /database:items /provider:MySQL /user:root /code:Items.cs
DbLinq Database mapping generator 2008 version 0.18.0.0
for Microsoft (R) .NET Framework version 3.5
Distributed under the MIT licence (http://linq.to/db/license)

>>> Reading schema from MySQL database
<<<>


3. You will have a C# code file, Items.cs in my case, automatically generated. This file contains C# classes generated from database schema and the mapping attributes.

4. You may want to compile the project now. I found some errors in my cases:
  • There is no type specified for fields of MySQL's Enum type. You can fix this easily by insert C#'s "string" type. In my case: private _gender; to private string _gender;
  • EntitySet cannot be resolved. Change every occurances to System.Data.Linq.EntitySet instead.

If you can compile your project, you can proceed to the next step.

5. Here is my code for querying from MySQL database. From my setup, it's an ASP.NET web application with a single GridView on the Default.aspx page.


6. Run and see the result : )

Monday, November 17, 2008

Com Eng Undergrad Project Showcase at Nitad 15


If you are in Thailand you must not miss this! :)

I will also, hopefully, arrange the showcases of my course projects in Computer Graphics and Image Processing there too.

The venue will be Building 4 of Faculty of Engineering, Chulalongkorn University, between 26 - 30 November 2008.

Here are some screen shots taken from my project with my friend, Opalism, in Image Processing course. Can you guess what's it all about :) ?


Friday, November 14, 2008

How to Lock Zoom level in Firefox


Since Firefox 3.0, I find the "Full Page Zoom" function very useful in daily life. The only problem with this function in Firefox is that it has no support for "default" zoom level. That is, when you navigate to the new web pages, you need to adjust the zoom level every time.

Fortunately, someone has built the extension to solve this problem. The No Squint add-on allows you to set default zoom level. And I'm living happily with it for a week so far :)

Get No Squint Now

Monday, November 10, 2008

Invitation to 15th Nitad, Bangkok, Thailand

Nitad: 26-30 Nov 2008

"Nitad" is an engineering exhibition held at Faculty of Engineering, Chulalongkorn University, Thailand, once every three years. You don't want to miss this chance! Here are what you might expect from Nitad
  • Course project showcases from many students in all engineering fields.
  • The famous RoboCup world champ team, Plasma-Z, in action!
  • Guidance for high school students who are finding more info about faculty of engineering and its sub departments.
  • Fun activities!

You may like to watch a promotion video by SlaSua :) It's a great one in my opion. And it summarizes what we have in Nitad.

Saturday, November 1, 2008

Google DevFest Bangkok Wrap-up

Yesterday, I attended the DevFest Bangkok workshop, organized by Google team, at Chulalongkorn University.

The event was fun and I spent most of my time in Chat room o__O (huh ??) There are 3 sessions which are

OpenSocial: It is an API which serves as middle-tier for Social Network. So the social network application developers don't have to re-implement their application for every different social networks they target. The first presenter, Patrick Chanezon, described the overview of OpenSocial API before passed the control to other API implementers from Hi5 (it is actually a video session), Friendster, eXo Platform, and Globant.

  • Add as friends: chanezon, pamela.fox, ...
  • chanezon, jeremi23,

OpenSocial Foundation Vote

Coding Resources
Links about opensocial in general, many tags to refine what you want to read
http://delicious.com/chanezon/opensocial

Links to code samples and resource for opensocial
http://delicious.com/chanezon/opensocial+code

OpenSocial tutorial
http://code.google.com/apis/opensocial/articles/tutorial/tutorial-0.8.html
code:
http://opensocial-resources.googlecode.com/svn/samples/tutorial/tags/api-0.8/


Google Maps: Presented by Pamela Fox. The session demonstrated various uses of Google Maps API and its flexibility. The API is flexible enough to created a Zombie-shooting game also demonstrated in the session. @pemela.fox is also very active user in the chat room : ) Slides

App Engine: I think the attendees are interested in this session the most. The presenter, Patrick, gives overview of App Engine. I personally like Google-style presentation. The slides are simple and embedded many humour (BigTable.) The Simple AJAX Chat demo app is actually the chat room attendees were using.


Wiki Code Walkthrough (not used in talk, may be useful)


The event finished around 10 PM, which is very unusual for any formal event in Thailand. And I would like to say special thanks to my friends in CP32 who makes this happen : ) Because of my constraint (there is only one thing, you know :P), I can't help them much in organizing the event at my university. And what they have done is one of very great technical event in Thailand.

Most of the material are from this page: http://docs.google.com/View?docid=dggjrx3s_2390ww9hw5fh

Monday, October 13, 2008

Using Custom Icon for Your USB Flash Drive


Isn't it great to have your personalized USB Flash Drive Icon ?

First things you need to do is to prepare your own icon. If you still cannot get one, I recommend you to read my post: Create your .ICO Icon File.

Follow the steps below to change your USB Flash Drive icon.
  1. Copy your prepared icon to the most outer location of your flash drive. In this post, my icon name is"dora.ico"

  2. You will now have to create "autorun.inf" file at the same location as your icon. I recommend you to download my autorun.inf file from here (Right click on the link and click Save Target As ..) and put it on your flash drive.


  3. Change the content of autorun.inf file by double click on it. You will need to change my "dora.ico" to your icon name. Don't forget to save the updated file before closing Notepad.
    [autorun]
    icon=dora.ico
  4. Safety remove your flash drive and plug it in again. And your flash drive icon will be changed to the specified icon : )

Creating Your .ICO ICon File

There are times when you need to create your own .ico icon files :) With your own icons, you can do many things to personalize your workspace. For example, Using your icon for a USB Flash Drive's Icon or your icon for your file folder.

Creating an icon file is easy. All you need is a icon editing software. In this post I will show you how to create icon using Sib Icon Editor which can be downloaded and used free of charge. You can find the download link at the end of this page.

To create an icon using Sib Icon Editor, follow the steps below.

  1. Start the Sib Icon Editor program.

  2. In most cases, you will want to create icon from photo or prepared image from another image editing program. We will click on "Create a new icon from image file" in this step and choose your image.

    Create a new icon from image
  3. The image will be imported. You can configure some parameters of the generated icon in this step.

    Configure icon parameters
  4. You can do some further editing. When you're done, click on the File menu and Save as... to save your icon file.

    Save your icon file
  5. The icon files created from the program will have .ICO as extension.
Icon file
You can now use the icon created anywhere you want : )

Related Pages:

Sunday, October 12, 2008

New Microsoft Touchless Demo: Multi-touch without Touch

Well, Microsoft has just release their new Touchless SDK which enables the user to give input using gesture, without touch :) This is possible via the use of color tracking with web camera.


The Touchless SDK is an open source SDK for .NET applications. It enables developers to create multi-touch based applications using a webcam for input. Color based markers defined by the user are tracked and their information is published through events to clients of the SDK. In a nutshell, the Touchless SDK enables touch without touching.


However, I found that running the demo isn't quite straight forward. Here is what you need to do.

  1. Set up your web camera by selecting the camera you want to use in "Camera" page.

  2. Set up the markers. You need to use "Markers" which should be objects with bright colors such as tennis ball, a plastic toy. You need to get the web camera to see your marker and click "Add A New Marker" button. The image will be freeze and you need to mark area of your marker by click on the image and drag a circle around your marker. After that, the demo will be able to track your marker like this.


  3. Now, enjoy the demo! :)

For those who still cannot run the demo now, you can watch the video of demo program running here.


Related Page:

Saturday, October 11, 2008

Control Windows Media Player using Windows Mobile Devices

I once coded a Power Point controller for Windows Mobile. It works great and I wanted to bring similar things to other applications, such as Windows Media Player, too.

However, I found Bluetooth Remote Control for Windows Mobile. And it is actually working for me :) I can now get Windows Media Player to play next song, increase/decrease the volume .. from my bed. Doesn't that sounds cool ? :P

Here are some few things to note:
  1. You need a PC and a Windows Mobile Device all with Bluetooth radio. The PC must also runs Microsoft Bluetooth or Widcomm/Broadcomm bluetooth software (technically called a Bluetooth Stack.)
  2. Don't forget to check "Allow Bluetooth devices to find this computer" in Bluetooth setting in Control Panel.


  3. The setup is straight forward. Just install the software on PC with Windows Mobile devices connected.
  4. To use the application, run the Bluetooth Remote Control Server on PC and run the Client in your Windows Mobile Device. Select the server from list and you can now enjoy the application :)
Download Bluetooth Remote Control

Sunday, October 5, 2008

A New Hope for PSP Emulator on PC

Actarus has just release "Sam", the new PSP Emulator which runs on PC. At the current stage, the emulator can only run some PSPSDK examples and homebrew games developed by the community.

Actarus, the author, also provides source code of this emulator at his page. You can check it out here (Sam)

I wish the emulator will be able to use with commercial games soon :)

Saturday, October 4, 2008

Compile Source and Run programs from Notepad++


Notepad++ is, unarguably, one of the most popular text editing tools of the moment! It supports syntax highlighting of all imaginable programming languages. Best of all, it is open-source software which can be used for free :)

Notepad++ itself is intended to be a text editor. However, we can configure it so it can run some external tools such as loading a web browser with the current file, or compile a Java/C++ source files. This can be done with the help of Notepad++'s built-in environment variables.

For example, the typical command for running a Ruby program is

ruby "C:\path\to\my\file\myfile1.rb"


To run this command from Notepad++ and applies path of current file instead of "C:\path\to\my\file\myfile1.rb", you can goto Run menu -> Run ... and type the following command in the only text box in the dialog.

ruby "$(FULL_CURRENT_PATH)"
Now you can try to run this by click on the "Run!" button of the dialog. The $(FULL_CURRENT_PATH) is one of the environment variables available. The others are

The 5 environment variables contain:

FULL_CURRENT_PATH : E:\my Web\main\welcome.html
CURRENT_DIRECTORY : E:\my Web\main\
FILE_NAME : welcome.html
NAME_PART : welcome
EXT_PART : html

However, there is a problem left. After you click the "Run!" button, a black command-line window appeared and disappeared immediately so you can't see the result.

You can prevent the command-line window from automatically closing by using this command.

cmd /K ruby "$(FULL_CURRENT_PATH)"


Hope this helps :)

Related pages:

Thursday, October 2, 2008

Internal Error 2739 while installing Adobe CS3 on Vista

If the setup program prompts you with "Internal Error 2739" then, you might want to consider this solution.

  1. Click on the Start button. Go to Accessories. Right click on the "Command Prompt" and choose "Run as Administrator" from the context menu.
  2. Type regsvr32 jscript.dll in the black window and press enter
  3. Try to run setup again. It should proceed smoothly now :)

Monday, September 29, 2008

Build HTK 3.4 from Source with Visual Studio 2008

I don't know why the HTK website itself did not provide a download for Windows binary release so we don't have to rebuild it again. However, I found that the binary for HTK 3.3 is available for download at their software archive page here (you need to be a registered user first, free of charge.)

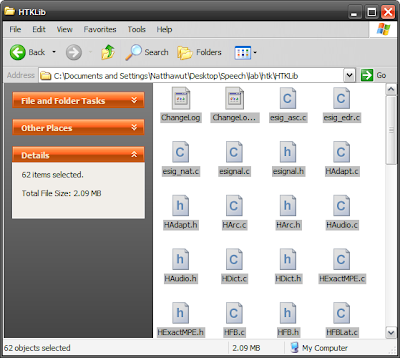
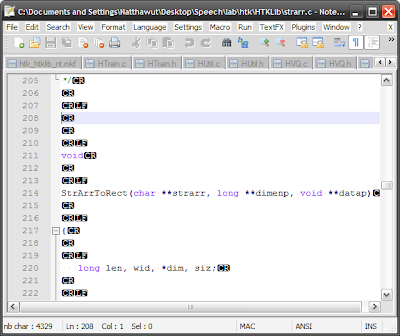
I followed the notes posted by Ivan Uemlianin. The notes suggest me to convert the HTK source files which is in Mac format to Windows format. These source files have additional characters (CR CR CR LF) instead of Windows' (CR LF.) So you need to correct them before using Visual Studio's nmake.

Convert Mac's files to Windows'

Ivan Uemlianin himself uses a Python script to convert the files. The method I used here is not involved with programming. But you need a open-source software Notepad++ instead. Download Notepad++ here.

First, I drag all the files those need to be compile into Notepad++. Then, I turn on the "Show all characters in View -> Show all characters.


Next, the most important part, replace all the (CR CR CR LF) with (CR LF.) Fill in the "Find what :" with "\r\r\r\n" and "Replace with" with "\r\n" as shown in the picture below. Notice that the "Extended (..." checkbox at the bottom of dialog is checked. When you are ready, click "Replace all in all opened documents."

It will take a while on an old computer. Mine takes around 40 seconds :(


After the process finished, press the "Save All" button. Now you are ready to nmake the source files! You can follow the readme provided with HTK from now on :)

Sunday, September 28, 2008

Google DevFest Bangkok

The registration is open now and those who are in Thailand on October 31st might want to join the event :)

Thanks to my friend, Aruj, who informed me about this.

Register for DevFest Bangkok here

What: Google will be holding a DevFest in Bangkok. Join us for a day of coding and fun, where we'll cover topics ranging from OpenSocial & App Engine to YouTube & the Google Maps API.

Who: You! We'll provide space, power, and refreshments. You just need to bring your own laptop, ideas and enthusiasm to complete the mix.

When: Friday October 31st, 2008 1:00PM-10PM

Where: Chulalongkorn University

Saturday, September 27, 2008

Syntax Highlight/Format C#, Java, PHP Code in Blogger

The method I used to put syntax highlighted code in my blog is to use the "Code Format" tool provided by Manoli.net. It works fine but I am just lazy to convert my code every time I post a new entry.

I then try to find another solution. One option is to use SyntaxHighlighter, a Java Script library that does all the syntax highlight jobs for you.

After installation, one problem I faced is that all the "new line" I wrote in "Edit Html" of Compose Page in Blogger are converted to "
". That's not very nice : (

Like everytime, I performed a search and found a good solution here, Using SyntaxHighlighter on BLOGGER. The purpose of additional script is to convert all the "
" found in the code to "new line" chracter. It works fine and here is my sample of highlighted Java code.

(Of course, I will not use silly program like Hello World for this :D )

And here is the result:


Simple, isn't it ?

Friday, September 26, 2008

The Most Simple Introduction to Artificial Neural Networks


I would like to share you a good stuff on learning the basic of Artificial Neural Networks.

Artificial Neural Networks (ANNs), often refer to as Neural Networks, is one of the most well-known tool in Machine Learning. There are many websites available which provide basic theory of Neural Networks so I will not cover them here.

The hard part about ANNs is the Mathematics involed, how to implement them, and apply them to good use. There are many articles in CodeProject.com that try to present the ANNs in a simple, reusable ways. But, in my personal opinion, they are all hard to understand and reuse. I had read some of these articles once and I found that most of the content are too advanced. I just need to know a very basic part of ANNs and put them into good use, in short time.

I also have to admit that, sometimes, Object-oriented and Reusability are what make the code more harder to understand than it should be. I just need a "top-to-bottom" code in single method that explains what is going on. Distributing the data and logic in OO style is just not suitable for the purpose of learning algorithm.

Then, I came across this page: Implementing a Neural Network in C. This page explains very briefly everything you need to know and implementing an ANNs. And, most of all, the code is in non-object-oriented C language! That makes it is easy to learn and understand. I then followed the article with Java and everything was fine. I could adapt it to my homework problem at the university and got quite good result.

Finally, I really recommend this page to everyone who need to get started with ANNs, quick :)

Monday, September 8, 2008

Build a member system in ASP.NET 2.0 without using the Providers

ASP.NET 2.0 Provider Model

If you search for something like "authentication, authorization, member, role, user with ASP.NET," the first thing that is likely to come up is the famous ASP.NET 2.0 Provider Model.

A provider is a software module that provides a uniform interface between a service and a data source. Providers abstract physical storage media, in much the same way that device drivers abstract physical hardware devices.

To make things simple, providers are interfaces those represent ASP.NET 2.0 services: Membership, Profile, Role, Sitemap, Session State etc. The implementing classes of these providers are responsible for storing state data in storage media that maybe a SQL Server database, MySQL database, XML file or even a plain text file. We can say that the Provider Model is somekind of Strategy Pattern.


One of the providers is Membership Provider which standardized the way ASP.NET developers implement a member system in ASP.NET 2.0. By using Membership Provider, many benefits are gained. For example,

  • Every ASP.NET programmers implement the member system the same way. So it is easy to understand/work across different projects.
  • Easy to migrate to other database. Just change/reimplement the provider!
  • Can take advantage of ASP.NET's ready-out-of-the-box Login controls: Login, PasswordRecovery, CreateUserWizard, ChangePassword etc.
So, What are the problems ?

While there are so many benefits, ordinary developers suffered from Provider Model from many reasons.
  • It takes too much effort to implement a provider. Take a look at Implementing a Membership Provider. I just don't want to waste time reading this document just to build a member system on my small website.
  • The Login Controls looks inflexible to many developers. It gives the impression that they will not allow the developers to do things the way they want. Despite the fact that these controls are highly customizable ... with some efforts.
  • It has too steep learning curve. In a time-crisis situation, developers may consider implementing member system the manual way.
This makes some developers turn back from Provider Model and implement their own logics.

The member system we are going to implement is simple, utilizing only the FormsAuthentication in ASP.NET 1.x style.
  • Create new user
  • Login and Logout
  • Restrict access to pages in directory according to user's roles
Note that the readers' experience on ASP.NET and ASP.NET 2.0 are assumed :) and most of the code comes from "Role-based Security with Forms Authentication" by Heath Stewart.

Create new user

This is straight-forward. Just layout some fields and add some validators. The initial user data is then inserted into the database.

Login and Logout

We must first have the logic for authentication. For example, the person with username and password pair are queried from database.


We then need to modify the web.config file to indicate the authentication method and the location of login page. Add these lines under <system.web>


Next, for the login logic, here is my sample code.


In this case, every succeeded authentication will give the current user the role of "Customer."

Finally, add the Global.asax file to your project if none exists. You can add the Global.asax file from Add New Item Dialog. Overrides the Application_AuthenticateRequest method like this:


Restrict access to pages in directory according to user's roles

To protect a directory, add a separate web.config files containing these lines to each directory.


The allow tag specifies roles those can access the directory.

You can now also use ASP.NET's Login Controls
  • LoginView Control: To display different message to users those have been logged in and those not.
  • LoginStatus Control: To display Login/Logout link.
  • LoginName: To display username of current user. Same as using HttpContext.Current.User.Identity
Hope this post help those ASP.NET developers, especially for those with time-constraint :)

Monday, August 4, 2008

Printing Large Visio Diagram


My friends in SE team seem to have some passions with the diagrams. That makes the diagram big and cannot fit on a single A4 paper.

To print one of these diagrams onto multiple sheets of A4 paper, you can simply go to Page Setup. And then under the "Print Zoom" section, adjust the "Fit to x sheet(s) across by y sheet(s) down". After that, you can print the diagram as usual by go to File->Print. You will then need the scissors, glue and some hand works :D

Sunday, August 3, 2008

Live.com Doesn't Like Thai People

Long time ago, I was trying to sign up an e-mail account for my friend, Nattaporn, at live.com. But I was unable to. Live.com tell me that the user name "nattaporn" contains word that is not allowed.

Today, I tried to sign up with my mother name again and got the same error message.

What the two names have in common is the "porn" segment which is very common for Thai names. I am sure there are millions of Thai people those have their names containing "porn" (-พร). For instance, Siriporn (สิริพร), Nattaporn (ณัฎฐ์พร), Tuangporn (ตวงพร), Pornchai (พรชัย), Pornsook (พรสุข). "Porn" is, in fact, a good word in Thai which means "Blessing".
Live.com may has to reconsider this name filtering criteria since it is losing many of Thai users.

Sunday, July 27, 2008

Is Microsoft Visio Too Smart ?

Disable the auto-align feature of MS Visio

While there are many open-source software and freeware alternatives, Microsoft Visio is still one of the most well-known diagram-drawing software by the students. It can be used to create various type of diagram and it is installed on most PCs with MS Office installed.

However, certain features of MS Visio is annoying. When you try to move one object onto another object, Visio automatically moves the existing objects away which destroys your layout.

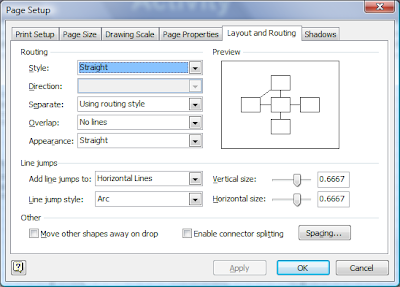
Usually, we want the objects to be laid on the screen the way we draw it. To disable this auto-align feature, go to File -> Page Setup ... -> Go to Layout and Routing tab. And then remove the check in front of "Move other shapes away on drop" at the bottom of the screen. Click OK button to finish.

Sunday, July 13, 2008

ASP.NET Provider Model Support in MySQL

After a long googling, I found that ASP.NET Membership Provider seems to be a good architectural choice for my project at the faculty. Microsoft prepared the providers for SQL Server out of the box. But I need my data store to be MySQL server. So something is needed to be done.

I first downloaded and installed MySQL Connector/Net 5.2.2. The installer also configured the machine.config file on my system too.

After that, I configured my project's web.config file to override the default connection string.

<connectionStrings> <remove name="LocalMySqlServer"/> <add
name="LocalMySqlServer"
connectionString="Datasource=localhost;Database=mydb;uid=root;pwd=root;"
providerName="MySql.Data.MySqlClient"/> </connectionStrings>

Then, I loaded the ASP.NET Web Site Administration Tool from Visual Studio 2008 and click on the Provider Configuration / Select a different provider for each feature (advanced) links to config MySQL providers with my project.

After the providers are configured, I went to the Security page but it provide me with error message.
Unable to initialize provider. Missing or incorrect schema.
I found out later that I need to create the database before MySQL connector can generated the schema. This is easily done by using MySQL's create database mydb command. Everything works fine in the end. All tables are generated.
mysql> show tables
-> ;
+-------------------------+
| Tables_in_mydb |
+-------------------------+
| my_aspnet_applications |
| my_aspnet_membership |
| my_aspnet_profiles |
| my_aspnet_roles |
| my_aspnet_schemaversion |
| my_aspnet_users |
| my_aspnet_usersinroles |
+-------------------------+
7 rows in set (0.00 sec)

Hope this helps people who are struggling with this problem :)

Other helpful blog on the topic:

Wednesday, June 25, 2008

Nerd Test

Haven't update this blog for a while. I am now very busy with senior/course projects.

Found this fun test from my friend's blog.


NerdTests.com says I'm a High Nerd.  What are you?  Click here!


Shocked to see myself scored 54% in Dumb-Donk category!

Sunday, March 30, 2008

Prevent _IG_FetchContent from caching data

_IG_FetchContent is a Java Script function provided by Google for facilitating iGoogle's Gadget development. Its function is simply to fetch data from a HTTP location.
_IG_FetchContent('http://www.google.com/', function (responseText) {
// do something
}
);

However, the HTTP request is NOT directly send from client to web server of that location like most AJAX calls. Google itself cache the content too. Which cause problems for Gadgets which need dynamic data.

To prevent Google from caching the data, the third parameter which is refreshInterval has to be specified.
_IG_FetchContent('http://www.google.com/', function (responseText) {
// do something
}
,{ refreshInterval: 1 });
The '1' means that the content at this location is cached for one second. Which is a reasonable amount of time.

Wednesday, March 12, 2008

My New Toy: X360 Controller for Windows

It is my summer! And I am spending my free time playing Need for Speed Prostreet, learning some new programming skills, and prepare myself for the internship program at IBM Solution Delivery, Thailand which will start at 17th this month.

When I played Need for Speed Prostreet for the first time, I found that Microsoft Wireless Keyboard was not responsive enough for playing this kind of game.

So, I decided to buy a new toy :)


I bought it from Pantip, Thailand's biggest computer store [and software vendors' nightmare :P], at the price of 1500 THB which seems to be too expensive for a game controller. I bought the wired version because some people in the forum said that the wired version is more responsive than the wireless ones. The wireless version also costs around 1900 THB.

The design is exactly the same as XBOX360 version. It has two analog sticks, one D-pad and four buttons. Despite the fact that I am a SONY fanboy. I have to say that this design is great!


There are more things to note about the controller's package design. First, there was a green stick wrapped around the end of the USB cord to warn the users to install hardware driver before plug the controller into USB port. It is really a great package design technique which can prevent technical problems for most users.


Second, it has a part in its cord that is loosely connected. So when people walk over the cord and accidentally trapped by it. The cord is consequently taken apart. So, the damage is not done to the game console, or the USB port of the computer.


My brother seems happy playing with it too. Here is photo of my brother playing Need for Speed :)


Wednesday, January 30, 2008

Easily display BufferedImage

In many situations, you may want to display the image from the instance of BufferedImage for debugging purposes.

The obvious way is to create a JPanel and overrides its paint(Graphics g) method. But that consumes time and energy!

The better solution is to instantiate an object of ImageIcon and use its setImage(Image image) method to host the BufferedImage instance in it. After that, you can easily display the image by using JOptionPane.

Saturday, January 5, 2008

No Telnet on Windows Vista ?

How to get Telnet in Windows Vista

Telnet is NOT installed by default on Windows Vista. You need to enable this by going to Control Panel -> Program and Features -> Turn Windows Features on or off and put a tick in front of Telnet Client. After the installation, you can load up Telnet client by typing "telnet" at the command line as you do in earlier versions of Windows.